Solved “More than 10000 hatch boundary objects are selected”, Autodesk Community
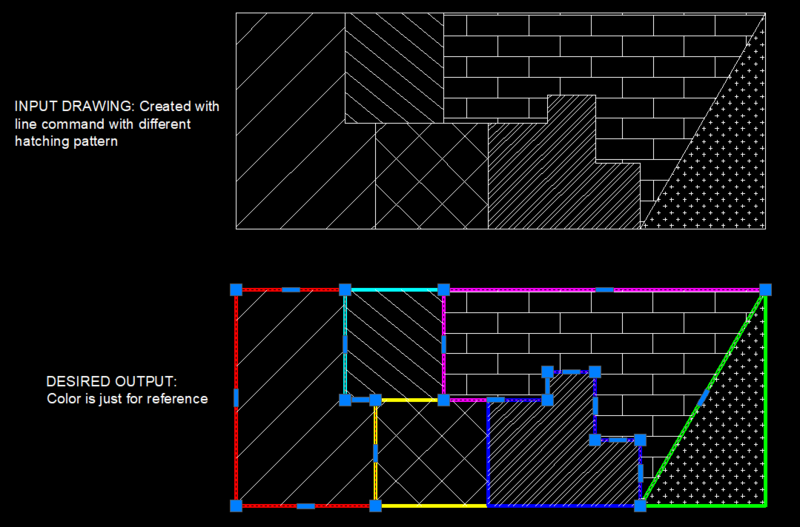
When hatching a small area in a large, complex drawing, you can save time by selecting a smaller set of objects in the drawing to be used in determining the hatch boundary. Select the objects to be considered for the hatch and press Enter. Selecting the objects with a crossing window is often the best method. Specify a point inside each area.
Boundary Objects and Beyond Buy Boundary Objects and Beyond by unknown at Low Price in India
We would like to show you a description here but the site won't allow us.
A Closed Boundary Could Not Be Determined Draw Space
Enter the HATCH command. Click the pull-down on the Boundaries panel of the Hatch Creation ribbon tab. Click the Select new boundary set. Select the objects which create the desired hatch area. Press Enter. Click an internal point to place the hatch. This will prevent AutoCAD from analyzing any other drawing objects.

Beginner tutorial Ways to define Hatch Boundary
A closed boundary cannot be determined. There might be gaps between the boundary objects, or the boundary objects might be outside of the display area. Expanding the Show details displays the following: Try one or more of the following: Zoom out until all boundaries are visible. Then specify a new pick point.

Figure 1 from The Dynamics of Boundary Objects, Social Infrastructures and Social Identities
Determines a hatch boundary by selecting a point within an enclosed area formed by one or more objects. While specifying internal points, you can right-click in the drawing area at any time to display a shortcut menu that contains several options. Select Specifies a hatch boundary based on selected objects.

Solved “More than 10000 hatch boundary objects are selected”, Autodesk Community
Solution. Enter HATCHEDIT on the command line. Select the hatch. In the Hatch Edit dialog box, click Recreate Boundary. When you see the prompt "Enter type boundary object", enter P for polyline or R for region. When prompted, choose whether or not to associate the hatch with the new boundary. Note: If you choose to use a polyline for the.

The selected boundary set has no effect when you use Select Objects to define a boundary. By default, when you use the Add: Pick Point option to define a boundary, HATCH analyzes all objects in the current viewport extents. By redefining the boundary set, you can disregard certain objects when defining boundaries without having to hide or.
Hatch boundary surround by Polyline AutoLISP, Visual LISP & DCL AutoCAD Forums
You create a hatch by selecting an object to hatch or by defining a boundary and then specifying an internal point. A hatch boundary can be any combination of objects, such as lines, arcs, circles, and polylines, that forms an enclosed area.. They are removed when you select another internal point for the hatch, or by using the REDRAW, REGEN.
Solved “More than 10000 hatch boundary objects are selected”, Autodesk Community
Determines a hatch boundary by selecting a point within an enclosed area formed by one or more objects. Select Adds hatch areas to the selected hatch by determining a boundary based on selected objects. When you use this option, interior objects are not detected automatically.

Boundary objects are dynamic concepts that maintain permeable... Download Scientific Diagram
By default, HATCH defines the boundary by analyzing all closed objects in the drawing. Analysis of all objects fully or partially visible on the screen as boundaries can be time consuming in a complex drawing. To hatch a small area of a complex drawing, you can define a set of objects in the drawing called a boundary set. HATCH does not analyze.

Solved “More than 10000 hatch boundary objects are selected”, Autodesk Community
These circles are temporary and can be removed with REDRAW or REGEN. Determines a boundary from selected objects that form an enclosed area. While selecting objects, you can right-click at any time in the drawing area to display a shortcut menu.

Brokers and boundary objects mapping information landscapes
Controls whether the command creates a single hatch object or multiple hatch objects when several separate closed boundaries are specified. Assigns the draw order to a hatch or fill. You can place a hatch or fill behind all other objects, in front of all other objects, behind the hatch boundary, or in front of the hatch boundary.

How To Draw Boundary Line In Autocad YourMomsDonuts Blog
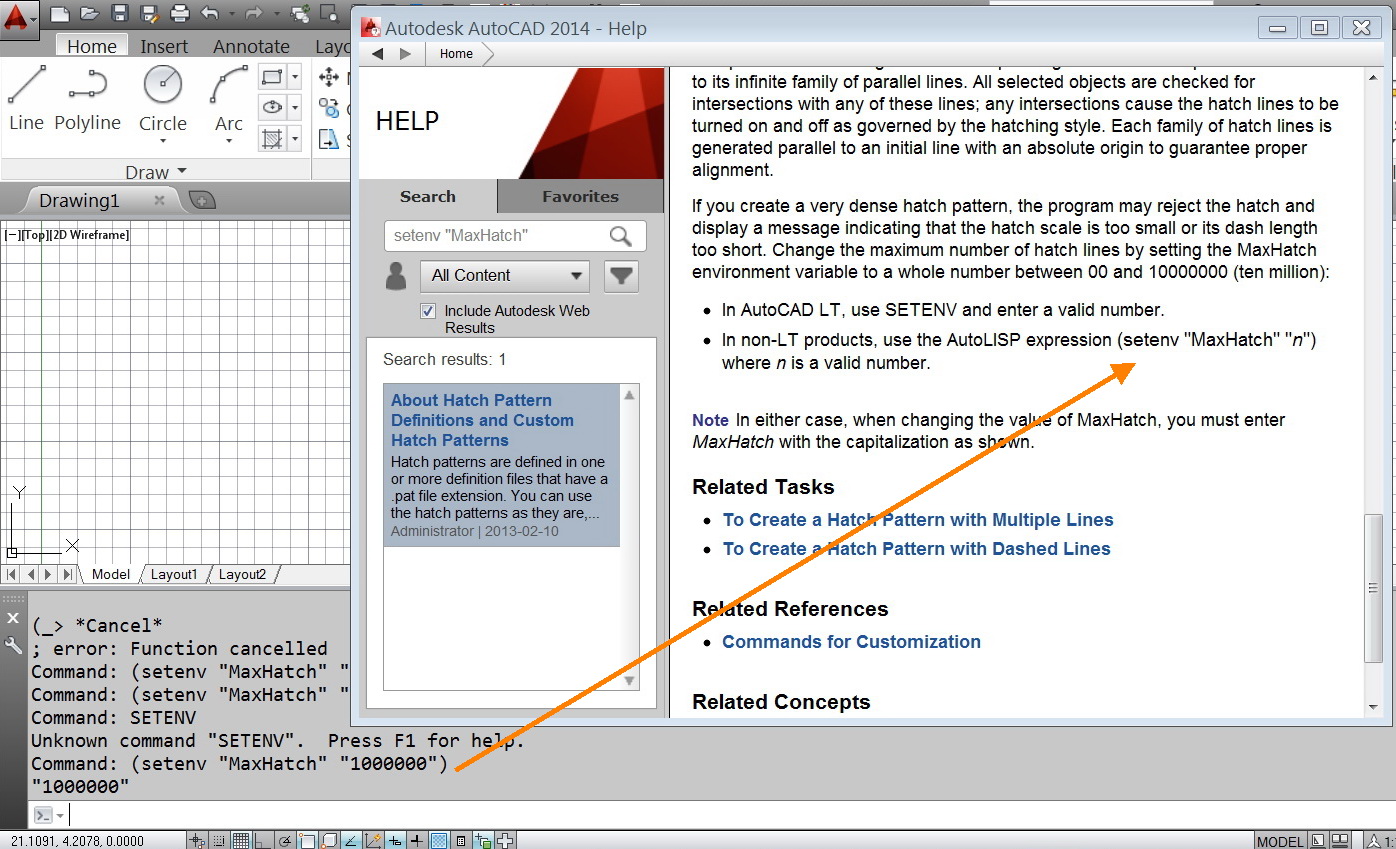
A similar message (alert box) is: " Hatch object limit exceeded: More than 10000 hatch boundary objects are selected. Creating this hatch object can be time consuming. Do you want to proceed? ". This one is caused by a very large object (entities) count on screen when picking a point in the BHATCH command.

PPT Boundary Object Theory PowerPoint Presentation, free download ID5759811
Solution: To resolve the issue, try one or more of the following solutions: Uncheck "Associative Hatch" in the options. Alternatively, on the Command line > set PICKSTYLE to 1 or to 0. Use the Properties palette to: From the Properties palette > the drop-down list of selected objects > click to select the "Hatch" object.

How to generate hatch boundary?
Select Boundary Objects. Inserts the hatch or fill within a closed object, such as a circle, closed polyline, or a set of objects with endpoints that touch and enclose an area. The selection method is retained until you change it. Click an area or object to be hatched. On the ribbon, make any adjustments as needed:

Boundary Object I YouTube
Download & Install About Retaining Hatch Boundaries In-product view The Hatch command can also create an outline of the hatch area by using one of two objects: 2D regions, which are like 2D planes, or polyline outlines. Hatch creates such a polyline boundary temporarily to establish the hatch area.